Author Topic: Heisler's WIPs  (Read 20643 times)

Heisler

  • Cadet
  • *
  • Posts: 30
    • View Profile
Heisler's WIPs
« on: September 16, 2020, 02:19:29 am »
I'm going to leave the title somewhat generic simply so that I can put my builds into a single post. I tend to work on multiple models and in phases so there is always something going on that I can work on when I only have a few minutes. Even in the middle of this pandemic my wife always seems to find ways to occupy my time with something other than building models.

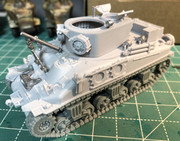
Phase 1 - Build in progress
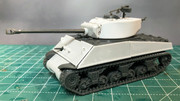
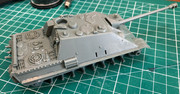
Phase 2 - Priming
Phase 3 - Painting in progress.

I break out priming and painting separately since I tend to let models build up here I have enough to make priming worth while or I'm ready for the next item in line. Oh and I'm only including the Rubicon Kits in this list.
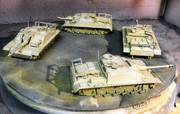
Currently:
Phase 1 - Resin M32B1, Jagdpanther
Phase 2 - M4A3E2 (conversion kit), M4A3/76,
Phase 3 - StuG IIIGs (3) and StuH 42


Heisler

  • Cadet
  • *
  • Posts: 30
    • View Profile
Re: Heisler's WIPs
« Reply #1 on: September 26, 2020, 02:51:36 am »
I’m in the detail portion of the build for the M32B1 ARV now, there are some pieces for the cables that will need to be scratch built. I have also just about wrapped up the painting and weathering on my U304(f) project so I can finally get back to my STuG III project. I acquired a book, well several, that has a picture that really caught my attention “STUG III & IV; German Army, Waffen-SS and Luftwaffe, Western Front, 1944-45”. On page 17 is a picture and a color plate of a STuG from the 341st Sturmgeschutz-Brigade. It has modified skirts and a debris shield over the gun mantlet. I thought if I could get match the skirt modification it would be a good unit to model.

Here’s my attempt at the modified side skirts. I think this is a winner, just need to work over the rest of the side skirts and make the debris shield.


neffer38

  • Private
  • *
  • Posts: 137
    • View Profile
    • My Instagram
Re: Heisler's WIPs
« Reply #2 on: September 29, 2020, 05:41:13 pm »
Clever use of a mortar. Need to work on a panther breakdown vehicle at some point and get a panthersturm done at some time


Heisler

  • Cadet
  • *
  • Posts: 30
    • View Profile
Re: Heisler's WIPs
« Reply #4 on: October 02, 2020, 02:15:41 am »

Working on getting the STuG skirts ready for painting


Heisler

  • Cadet
  • *
  • Posts: 30
    • View Profile
Re: Heisler's WIPs
« Reply #5 on: October 09, 2020, 10:36:50 pm »
Stalled out on the STuGs while I try and figure out how to make the debris shield over the gun mantlet. So I went back to my Jagdpanthers. The first one is finished and ready for paint, the second one is moving right along and third one is in the box and I hope to start it over the weekend.

One side note; there are two D-rings (C12 & C13). Don’t add them in step 1 as indicated in the instructions. Add them after you have assembled the upper and lower hills together.


neffer38

  • Private
  • *
  • Posts: 137
    • View Profile
    • My Instagram
Re: Heisler's WIPs
« Reply #6 on: October 10, 2020, 08:42:04 am »
Looking good. Need to add a jagdpanther from rubicon to my collection...along with everything else  ;D

Heisler

  • Cadet
  • *
  • Posts: 30
    • View Profile
Re: Heisler's WIPs
« Reply #7 on: October 24, 2020, 03:09:40 am »
Turning back to my STuGs I think I figured out how to make the debris shield that would cover the gun mantlet. I think, and I have found nothing to contradict it, the debris shield and the “bent” side skirts may be unique to this unit, the 341st Sturmgeschutz-Brigade. I’m mostly doing this to set my models off on the table.

I’m making this from a single piece of styrene scored and bent into shape. I’m feeling, based on a couple of reference shots, that the styrene might still be to thick. Still thinking about the approach. If I go this route I’ll fill the gaps like they were welds and a couple of bolts to each side.

Thoughts?


neffer38

  • Private
  • *
  • Posts: 137
    • View Profile
    • My Instagram
Re: Heisler's WIPs
« Reply #8 on: October 25, 2020, 10:17:37 am »
Looks about right.


Not seen it before tbh, that's what i found on a quick search, couldn't see much more.

Heisler

  • Cadet
  • *
  • Posts: 30
    • View Profile
Re: Heisler's WIPs
« Reply #9 on: October 26, 2020, 04:35:46 am »
That’s one of the three reference shots I have been using. Good enough I think!

neffer38

  • Private
  • *
  • Posts: 137
    • View Profile
    • My Instagram
Re: Heisler's WIPs
« Reply #10 on: October 27, 2020, 12:53:28 am »
yeah, if you wanted to be fussy...maybe a bit of filler into the gaps or heat up some plastic spru with a lighter and pull it out to make some long thin strands to drop into the gaps and then carve some lines across it make it look like a weld mark. Some of this I could have done on the bergepanther but didn't and no one called me on it ...yet  ;D


I have tried it on the Pantherturm base. Think it maybe a technique for when people do 1/35 scale tbh.

ripley

  • Captain
  • ****
  • Posts: 1,849
    • View Profile
Re: Heisler's WIPs
« Reply #11 on: October 27, 2020, 06:45:48 am »
I would say the plastic is too thick , the panel ( side skirt piece maybe ? ) looks to be less than 1/4 inch in the Stug photo . Either replace the plastic part with a thinner piece  , or sand the visible edge to give the effect of a thin sheet . In  real life the side skirt panels were 5mm thick ( turret mounted were 8mm ) , that's really hard to replicate in scale hence we have over thick pieces

Heisler

  • Cadet
  • *
  • Posts: 30
    • View Profile
Re: Heisler's WIPs
« Reply #12 on: October 30, 2020, 02:54:33 am »
On the first victim I have filed down the plastic and added some welding seams, although it’s hard to see it in the pictures. That shield was made from .030 sheet styrene. For the next batch I used two pieces of .010 Styrene sheet glued together. This made it much easier to bend without snapping completely. I then filled the gap with styrene strips and that gets trimmed down to make the weld seam. It also provides some much needed strength to the shield at those junctions.


Heisler

  • Cadet
  • *
  • Posts: 30
    • View Profile
Re: Heisler's WIPs
« Reply #13 on: November 16, 2020, 10:28:24 pm »
I finally managed some time at the airbrush booth and did some priming on the STuGs and Jagdpanthers. The STuGs received a spot priming of grey to cover up the glaring white debri shields. I also reprimed the lower hull in black. The Jagdpanthers received a full priming of grey on all the upper surfaces and black on the lower hull. I use the Stynylrez Primer from Badger.


Heisler

  • Cadet
  • *
  • Posts: 30
    • View Profile
Re: Heisler's WIPs
« Reply #14 on: December 23, 2020, 12:54:20 am »
Finally got some the basic paintwork done on the STuGs. They are ready for decals and then some weathering.