Having just recieved the new PzIV J's from a friend who attended UKGE and I couldn't resist assembling one.
Firstly, it's a marvellous kit, along with the M4 range it's definately set a high bar for models in this scale. I can't not be impressed with the way the Thoma Schurzen have been done - they don't feel too fragile either.
It's a reasonably complex kit (5 sprues), but the instuctions are pretty good - there are only a couple of things I'd want to point out as needing to be highlighted (though it could just be me who felt this).
1. When doing the lower hull assembly it's helpful to stick the deck down to the hull tub (parts E15 & A05) before attaching the exhausts (parts A12 & A14) as the exhausts have a small attachment points which overlap/sit on the surface of the deck (E15) as well as their main attachments on the rear hull (J06).
2. During the turret assembly, the thin ring (part F24) has a stepped underside - the deeper section fits into the groove on the turret top (part J20) that surrounds the forward half of the cupola.
I haven't yet assembled the Schurzen, and will most likely put them together as sub-assemblies to facilitate painting, so have not uncovered any dificulties with them yet.
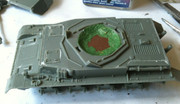
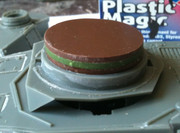
As with all my tanks, I magnetised the turret - games like What a Tanker require a freely moving turret, and the normal bayonet-type attachments, coupled with layers of paint and varnish, can both be stiff and damage the paintjob. Serendipitously, the hole in the turret base (part A07) provides a snug fit for Renedra 25mm flat bases. Four of these in a stack glued inside the turret base ring ((A07) seats the turret nicely (three protrude below the ring). I also filled the small circular depression in the centre of the deck (E15) with some plasticard - then a magnet will be countersunk in each - here's a couple of picks:
I'm probably going to wait untill the resin winterketten are available before going much further (they look too nice not to use) - I'm hoping that'll be soon


