Author Topic: Magnetising a Sherman  (Read 4031 times)

RFT

  • Cadet
  • *
  • Posts: 20
    • View Profile
Magnetising a Sherman
« on: March 06, 2019, 07:50:58 pm »
A month or so ago, I played a d-day scenario of Bolt Action against a friend, and it bugged my that my only sherman (a very late war easy-eight) was the only thing I had, so I decided to get a second sherman more suitable for summer-autumn 44.

Remembering the modular nature of shermans (and rubicon's kits), I decided that it would be cool if I could make a single model that could have VVSS, VVSS with "duckbill" extended track, be a 75 or 105, and be able to optionally fit the deep-wading trunking set.

I already had a big stack of 5mm magnets left over from doing turrets for my team yankee, so this thread is going to document what I did, and any problems that arise along the way.

 It's not going to be possible for 100% accuracy in places, but so far it's a nice exercise in getting the most out of the kits.

I've chosen the M4 composite sherman as it's my second-favourite sherman look after the very late flat front, but a lot of this will port straight over to the M4A2 and M4A3.
« Last Edit: March 07, 2019, 01:28:55 am by RFT »

RFT

  • Cadet
  • *
  • Posts: 20
    • View Profile
Re: Magnetising a Sherman
« Reply #1 on: March 06, 2019, 08:22:22 pm »
Tracks

required:
8 5x1 mm circular magnets
plasticard scraps
5mm drill bit.

The size of the bogies and the hull recesses they fit into makes this step really simple. I drilled into the front and rear recesses on the hull so the hole went all the way through.


After some cleanup, I then used plastic cement to attach a small backing plate to the hole inside the hull.


Once this had dried in place, I superglued the magnets into the hull, making sure to keep the same polarity. the plastic is quite thick so the magnet will be nicely below the recess mating surface.

I then assembled the tracks and then drilled a recess into the front and rear bogies. this is a little more awkward than the hull because the recess is almost as big as the bogie (so the centre of the is a hole, but the outer areas are drilling into the walls) and we need to ensure the mag ends up flush with the old surface.


once done, test fitted magnets to ensure that they were flush and glued them in taking extreme care over polarity.

I've found the best way to keep polarity in order is to but the magnets in a stcak on somethign steel, then mark the top of the magnet in the stack with a sharpie pen as each one is used. this doesn't stop them sneakily flipping over when being maneuvered into a recess, but I can at least see which way is up.


« Last Edit: October 21, 2019, 08:55:44 pm by RFT »

ripley

  • Captain
  • ****
  • Posts: 1,849
    • View Profile
Re: Magnetising a Sherman
« Reply #2 on: March 06, 2019, 08:35:30 pm »
Neat idea

ultravanillasmurf

  • Lieutenant
  • ****
  • Posts: 2,305
    • View Profile
    • Blog:
Re: Magnetising a Sherman
« Reply #3 on: March 06, 2019, 08:46:41 pm »
Interesting.
Did you put magnets in the one piece track units (parts A25 and A26) to attach the backs of the bogies (A12-17) as well or did you have enough of A12-17 for your tracks?

RFT

  • Cadet
  • *
  • Posts: 20
    • View Profile
Re: Magnetising a Sherman
« Reply #4 on: March 06, 2019, 11:19:12 pm »
It depends on the donor kits.

My donors are the M4A3 76 set* and the composite set - so because I built the 76 with HVSS I have the unused A12-17 (VVSS bogie backs) and extended tracks that came with that kit and the ones that came with the composite. If you were to do it off a single kit, then you would need to do as you say and choose a different break point. doing that might be slight easier in fact as you could probably hide the mags inside the wheels.

One other issue that I've not yet mentioned is that you only get one each of A20/A21 (inner drive sprocket), so one track versiion will have to go without  or I'll have to scratchbuld it out of plasticard. (though It's not very visible once the tank's together so may be skippable)

*annoyingly, since having this idea, I can't find my leftover parts from this set so I'm currently doing this in preparation of actually having the parts turn up.
« Last Edit: March 06, 2019, 11:33:23 pm by RFT »

ripley

  • Captain
  • ****
  • Posts: 1,849
    • View Profile
Re: Magnetising a Sherman
« Reply #5 on: March 06, 2019, 11:46:28 pm »
You really can't see that you are missing the internal drive sprocket unless you pretty much get your eye down beside the tracks , from a game perspective it still looks right . I did the same sort of thing using the extra track set from the T-34/76 kit .

RFT

  • Cadet
  • *
  • Posts: 20
    • View Profile
Re: Magnetising a Sherman
« Reply #6 on: October 21, 2019, 08:53:22 pm »
I never finished this thread, for a couple of reasons.

1: I'd forgotten to take photos of an important step
and
2: I'd thrown out my spare tracks, so the work was academic.

However, a local store had a sale on, and I'd decided I wanted an earlier m4a3(76)w that would be more suitable for late summer 44 so off we went again.

I've amended the first post with some photos of the chassis mods.

As far as the intake trunking is concerned, at the time I did the original assembly, I didn;t have the kit so had to make a couple of guesses.

I put magnets in the recess that's the underside of the M4's air intake. this turned out to be a waste as the wading kit here is a nice snug fit (though not tight enough to hurt the paint, it seems). also, if it wasn;t, the trunking sits in a place where it would be very hard to place magnets without being visible (I thought the chimney was directly abouve the air intake "hump", but it's not, it's aft of it)

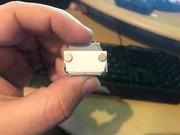
On the rear, I put two magnets on the inside of the rear plate when assembling the kit.

I magnetised the air cleaners with 3mm mags and the can be attached and detached at will.

I made an adapter plate for the rear trunking out of plasticard and glued two magnets to that. this nicely holds the trunking in place.


Finished Tank:


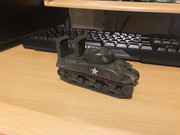
for this M4 comp, I;m going to see if I can work another pair of mags under the engine deck so stowage can be attached and detached.

I'll do some more updates with details on the M4a3 build as we go.

ripley

  • Captain
  • ****
  • Posts: 1,849
    • View Profile
Re: Magnetising a Sherman
« Reply #7 on: October 21, 2019, 10:49:25 pm »
That turned out great . Sometimes it does  take a while to figure / work things out. This hobby can be both very easy  ie : just  build and paint out of the box , or  complicated/frustrating as we try to kit bash / scratch build a certain version of the tank  to match a picture or idea we have . The trick is to eventually finish the kit which you.ve done . Six months from your last post on this kit isn't too bad at all , I've got kits I started in the 80s still waiting for that last bit of TLC to take them from the box to the hobby room shelf to gather dust ...

ultravanillasmurf

  • Lieutenant
  • ****
  • Posts: 2,305
    • View Profile
    • Blog:
Re: Magnetising a Sherman
« Reply #8 on: October 22, 2019, 03:38:37 am »
Nice work.