Author Topic: Various WIP  (Read 73049 times)

ripley

  • Captain
  • ****
  • Posts: 1,849
    • View Profile
Re: Various WIP
« Reply #90 on: January 12, 2019, 01:58:52 pm »
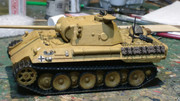
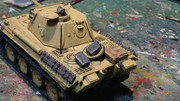
Finally got my Panther finished , must of have taken me a year  :-[ . But now its done . I added the pistol ports and message hatch to the turret to make it an early D . Also added some plastic rod to the C hooks to give their mounting a little more 3d look . I added the posts front and rear to hold the tow cables , which I haven't made yet .  ::) I should have changed the exhausts as they're more a G version , but with Rubicon's plastic being so hard I didn't think I could remove the molded on parts without really messing up the rear plate , plus I really didn't want to try and make exhaust pipes


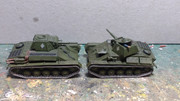
And over the last week I built 3 PSC 1/72 T-70 tanks for a buddy . I made one a captured tank used by the Germans , one pretty much built out of the box , and the third one I built as if it was knocked out with the commander dead in the turret and the driver bailed out


ultravanillasmurf

  • Lieutenant
  • ****
  • Posts: 2,305
    • View Profile
    • Blog:
Re: Various WIP
« Reply #91 on: January 14, 2019, 03:19:27 am »
Very nice.

ripley

  • Captain
  • ****
  • Posts: 1,849
    • View Profile
Re: Various WIP
« Reply #92 on: January 15, 2019, 07:51:17 am »
Thanks . I really like the Panther kit , and it will be a lot easier now to make the various sub versions with the 2 rear plates and the variety of exhaust pipes in the Jadgpanzer kit . Tha T-70 are really nice  PSC kits , of which  I've built  6 so far for Larry , I really love the look of that small tank ( plus you get 3 in a kit for about $20 ) . I'm hoping Rubicon produce one in plastic before I give in to getting a Warlord resin one during one of their sales  ::)
« Last Edit: January 15, 2019, 07:52:58 am by ripley »

ripley

  • Captain
  • ****
  • Posts: 1,849
    • View Profile
Re: Various WIP
« Reply #93 on: January 21, 2019, 12:30:21 pm »
WIP on my 251/9 . Its the Rubicon 251 D with their "Stummel " 75mm gun expansion kit .  The kit goes together very well , no problems at all  ( that haven't been user error ) , who reads the kit instructions ?   I decided to shorten the smaller tarp that came with the base kit using a razor saw and miter box , just for something different . Its not glued on ( press fits nicely ) so if I don't like the look when the kit is finished I can remove it . Decided to use a driver figure from Rubicon's 250 kit , he's a couple of mm too high with a helmet head , might try a wedge cap next , or bare headed . Could always sand his butt as a last resort  ::) .As   I now have two 251 upper hulls for the parts box , I was thinking of cutting out the doors on one of  the hoods and trying to find  an engine to depict a broken down vehicle , but that's a future project


ultravanillasmurf

  • Lieutenant
  • ****
  • Posts: 2,305
    • View Profile
    • Blog:
Re: Various WIP
« Reply #94 on: January 23, 2019, 04:12:48 pm »
Nice work.

With the spare bodies, are you going to cut the doors from one and the hole from the other?

ripley

  • Captain
  • ****
  • Posts: 1,849
    • View Profile
Re: Various WIP
« Reply #95 on: January 23, 2019, 09:23:46 pm »
That's the plan, giving me a second chance if I eff it up  ::) . Probably be a little tricky as Rubicon's plastic is hard compared to Warlords , need to change blades a couple of times to get a clean cut . For some reason the stock 251 kit has thinner plastic under the hood doors than the expansion kit hulls which are the same thickness as the rest of the kit .So I'll probably try to remove the doors from stock hull 1st , if that dosn't work out , I'll remove the other doors and sand the hell out of them to make them "scale" thickness ( or just make my own out of plastruct sheet )

ripley

  • Captain
  • ****
  • Posts: 1,849
    • View Profile
Re: Various WIP
« Reply #96 on: January 28, 2019, 11:40:15 am »
I've done a little work  on my 251-9 , mostly interior bits and  trying to get the crew to fit

Some pictures show the right hand side rear bench and some don't , as it was removable . I decided to install it and will probably add a extra crew man or two . As I was checking out pictures of the real thing for reference I noticed that the rear doors are installed with the internal locking bars narrow at the top , wide at the bottom .


Rubicon's plans on all three 251 D kits show the door installed upside down

Gonna cut  them some slack on that mistake though , as when I built my 1st 251 D a year ago I also checked out a couple of museum tracks and they show the doors as Rubicon drew them  so that's how I installed them . Thankfully it was an easy fix ... note to self , don't trust museum rebuilds  ::)

ripley

  • Captain
  • ****
  • Posts: 1,849
    • View Profile
Re: Various WIP
« Reply #97 on: February 18, 2019, 07:01:17 am »
Still working on crew for my 251/9 , plus have been reworking the crew figures for the other three 251s I've got as I just found a couple of BA German figure sprues to use for parts . As I take a break from test fitting ( and cutting up ) arms , I decided to start on my Type 97 tank . Since most pictures I can find show knocked out tanks , I decided to go down that route . 1st up add some transmission / reduction gear housing type things which will be visible through the front hatches , as most pictures show these hatches blown or forced open . Type 95 for reference


ultravanillasmurf

  • Lieutenant
  • ****
  • Posts: 2,305
    • View Profile
    • Blog:
Re: Various WIP
« Reply #98 on: February 18, 2019, 07:05:09 pm »
You do make your life difficult ^__^.


ripley

  • Captain
  • ****
  • Posts: 1,849
    • View Profile
Re: Various WIP
« Reply #99 on: February 19, 2019, 12:01:19 am »
True  ::) , but its better to add that stuff now , before the hull parts are glued together , than decide to try and add stuff like that after the kit is glued . And yes I have done that kind of thing working with tweezers through very small hole  :o Sometimes it's best to buy the  kit and look at the parts and think about the build for a month or two , rather  than jump right in and half way through the build  get a great idea about adding interior bits or opening hatches . Trashed a lot of 1/35 kits doing that in my youth...

ultravanillasmurf

  • Lieutenant
  • ****
  • Posts: 2,305
    • View Profile
    • Blog:
Re: Various WIP
« Reply #100 on: February 19, 2019, 03:19:32 am »
Sometimes it's best to buy the  kit and look at the parts and think about the build for a month or two , rather  than jump right in and half way through the build  get a great idea...
Such as the cheek armour on my M4 kit...

ripley

  • Captain
  • ****
  • Posts: 1,849
    • View Profile
Re: Various WIP
« Reply #101 on: February 19, 2019, 12:13:19 pm »
When cheek/ side hull armor was added at the factory ( year ? )  , it was also  shipped over seas in kit form to be   welded on to tanks already in combat.   So if you glued it on sloppy like  ::) it would just look like bad welding done by a forward work shop . I have seen some sketchy looking hull side plates ( M4A1 ) weld jobs . Later of course the cheek patch was integail with the turret casting as were the   side pieces on the  M4A1 hull

ultravanillasmurf

  • Lieutenant
  • ****
  • Posts: 2,305
    • View Profile
    • Blog:
Re: Various WIP
« Reply #102 on: February 19, 2019, 04:16:00 pm »
I applied the cheek armour with no problems. The problem was I assembled the base kit and then had a look through the British Tanks In Normandy book for example stowage for 33rd Armoured Division and discovered no photographs of Sherman Is with cheek armour. Some of them do not have the pistol port (number 66 for example), so they probably have the improved turret castings... They do however have the M34A1 mantlet.

The Sherman Minutia (http://the.shadock.free.fr/sherman_minutia/turret_types/75mm_turrets.html). Turrets were supplied with the cheek armour spring to summer 1943, going over to improved castings summer to end 1943.

The thing that always amazes me is that production had ceased on Sherman 75s six to eight months before D-Day (except A3s).
http://the.shadock.free.fr/sherman_minutia/data/sherman_production.html

Of course if anyone is doing some French M4s, there is the option of the cheek armour over the improved casting which is really messy.

ripley

  • Captain
  • ****
  • Posts: 1,849
    • View Profile
Re: Various WIP
« Reply #103 on: February 19, 2019, 08:55:00 pm »
Well , you can find the occasional strange Sherman out there which dosn't match the rest in the Squadron . All the 75mm turrets were interchangeable so you might have one with out cheek armor ., if the turret was replaced . Same would go for gun mantle , drive sprockets, HVSS /VSS wheel assemblies or even 3 different pattern road wheels on one side . The 75mm Sherman was the Lego tank of WW2 IMO  :D

ripley

  • Captain
  • ****
  • Posts: 1,849
    • View Profile
Re: Various WIP
« Reply #104 on: February 20, 2019, 11:46:11 am »
I'm not that happy with this kit , I was under the impression you got 2 complete turrets like the KV kit . You don't , you get ALMOST 2 complete turrets . Only 1 commander's cupola is included , although you get 2 sets of hatch covers . As well you only get 2  armored machine gun barrels and one front driver's plate and you  get 2 complete upper hulls though including 2 sets of exhausts . I was figuring on building one tank and burying the other trackless hull as a pill box . Guess I'm going to have to set it deeper in the base to hide the missing bits .   One Type 97 WIP

The items marked in red are what you need to complete the second hull .Hm, what to do .....idea ! I decided to use the closed commander's hatch part left over from a BA Panzer IV , I have a few . Its the right shape , and almost the perfect size to fit in the hole in the turret roof . I added a few bits of plastic to represent ( I think ) vision ports , what ever they are they show up in pictures . I used extra machine gun barrel from the BA plastic Japanese set for the turret rear gun , not perfect but looks the part . I'm also adding some plastic strip to the front of the hull to replace the missing panel ,as it will be buried it probably won't be seen , but ....


« Last Edit: February 20, 2019, 11:55:52 am by ripley »